Tuesday, February 21, 2017

Get You Sh*t Together, Carol

\\


Get Your Sh*t Together, Carol

As an adult, I'm finally getting my shit together. Slowly, but surly, I'm getting rid of all of my junk areas (i.e.: junk drawers, closets, and general areas). You've seen the big one, cleaning up the "junk room" 


Junk drawer... done. 


The space above the fridge: 

The space below the sink: 


Even the freezer: 
Pre-made frozen meals in the bin, pizza and beef sticks in the middle, frozen vegetables underneath the shelf, ice cream on top, ice packs on the far right, meat on the inside of the door rotated by the date they were bought (new purchases go on the bottom shelf, old purchases get rotated to the top shelf)

Not to offend anyone, but I am not the type to make cutesy, fancy organization. I just want something functional. 

Here are some tips for functional organization: 
  • Keep any sort of container. Old food containers that have lost their lids, empty sandwich bag boxes, etc. I've used all of these for some sort of organization. 
  • Buy new bins from the dollar tree. I'm always picking up new bins from the dollar tree. I love the bins I have for my socks, underwear, and bras. 
  • Use organizing as a time to purge all your old stuff. 
  • Make sure everything is easily accessible and easy to put away. If it's not easy to put back, the likelihood that it will get put back (either by yourself or your husband) is very slim, and that defeats the purpose of organizing. When planning your organization, think if I were to come get this item in a month, would I put this stuff back correctly, or would I just shove it back in there? 
  • Bins are not just for holding things, they can be used for so much more. You can see our "liquor cabinet" is actually a bin turned on its side. It looks like a cool, modern, IKEA inspired shelf, but just kidding, it was $3.99 from Goodwill. The nice thing is if we ever to get to the cabinets behind the booze shelf, it's easy to move everything out of the way. 
  • Utilize vertical space. Stack things as much as possible. This seems obvious, but sometimes you don't realize how much vertical space you waste. Stack things, add rails, hooks, shelves, anything you can to use as little floor space as possible. 

That's pretty much it. 


Get your shit together, Carol. 


Sunday, February 12, 2017

Apartment-Friendly Craft Station

Apartment-Friendly Craft Station

My husband and I currently have a nice 2 bedroom apartment. One of those is our bedroom, or course. The other bedroom is a multipurpose room, including the following purposes: video games, mechanical engineering, arts and crafts, sewing, storage, bedding, laundry, and a guest room. 

Lately, it's looked a little like this: 

It's essentially been turned into a giant junk drawer. Anything we don't want to deal with or need to store somewhere has been thrown in this room. 

I tackled this project over the weekend, and I have to say I'm pretty proud of the results. I needed something that was functional, attractive (or at least not a complete eye-sore), not very permanent (since we hope to be moving into a new house soon!), and takes up a minimal amount of space. 


Here's what I ended up buying: 
  • 4 stackable storage crates (as pictured above. It's almost like one of those "I Spy" books)
  • (1) 1 x 6 board that was 7 ft long
  • 2 L-shaped brackets
Luckily, I already had 4 stackable storage crates, stain, zip ties, and black spray paint.


Here's what I did: 
  • I spray painted the pink crates to match the ones I already had
  • Once they were dry, I made a two towers of 5 crates. Since the different brands didn't securely stack on top of each other, I just zip tied them together. Not very classy, but you can't see it when it's all finished. 
  • Stained the board
  • Hung my L-shaped brackets to hold the board right above the two crate towers
  • Screwed the brackets to the board
Ta-da! Much better: 

I only had to put in a few nails, since there wasn't going to be anything heavy on my shelf. 
Quite the transformation for a weekend project and $30!


Saturday, January 21, 2017

DIY Gift Jar

The Treat Yo' Self Jar

It's the weekend, yo! Which means sleeping in, glasses of wine, and re-binging on Parks and Recreation on Netflix, and looking something like this: 

In between all this, I decided to post my DIY "Treat Yo Self" Gift Jar. For those of you wo don't watch Parks and Rec, you could just call it the Spa Gift Jar. But seriously, Parks and Rec is hilarious. Watch it, and you won't regret it. 


Anyway, so here is a great gift in the range of $10-20 (depending on the items you put in the jar) for a friend, co-worker, mother-in-law, mother, bride-to-be, aunt, sister, or anyone who is stressed and could use a little pick-me-up. And it's a really cute, easy, customize-able gift for any event/person/budget. 

Here's what it looks like:
See? Super cute!


And here are the contents with their respective prices: 

The total cost of all these items was $13.08 before sales tax. I bought the jar for $3.00 in the bargain section of Target. I'm sure you could get it at the Dollar Tree as well. I finished the whole thing off with a twine bow, and ta-da!

Friday, January 20, 2017

Pedestal Table Makeover

Pedestal Table Makeover

I am so sorry this is going to be the worst before and after project reveal for the fact that I did not take before pictures. But here is kind of what I started with: 


Just a run-of-the-mill craigslist pedestal table. The table top was made out of solid oak wood,with a solid oak leaf, and there were minor water rings on the table top. The bottom was in good shape (definitely made out of cheap pressed wood rather than solid wood like the table top). 

Here's what I did: 
  1. I detached the pedestal from the table top by taking out the screws. 
  2. I sanded down the table top. I did not strip it all the way down to the bare bones, as I knew I was going to re-stain it a similar color. 
  3. I wiped down the table top to get rid of all of the sawdust and let it completely dry
  4. I stained the table top using "hickory" colored stain 
  5. After letting the stain dry completely, I applied 2 coats of poly 
Now for the pedestal: 
  1. I cleaned the pedestal first and foremost
  2. I was able to detatch the legs from the pedestal hull
  3. I lightly sanded all parts of the pedestal to prepare for spray painting
  4. I applied 3-4 coats of white spray paint, until the entire pedestal looked uniformly white. 
  5. I applied a clear coat of spray, just because I would hate to have spaghetti or something drop on the white pedestal and leave a stain. I think it would have been safe if I skipped this part, but I wanted to be sure. 
  6. After everything was dry, I put it all back together. 

Ta-da: 


Not too shabby for a $20 Craigslist find! I really didn't need a new table, but I couldn't pass up a chance to make this a beautiful table. It went back on Craigslist for $50 (I could've gotten more, but I wanted to get it out of my apartment), and it went to a nice couple who is expecting a baby soon! Well worth the time :)

Like I said, next time, I will include more pictures. This was done on a whim, so I will be more thoughtful next time. 


College dining room set make-over

Dining Room Set Make-Over

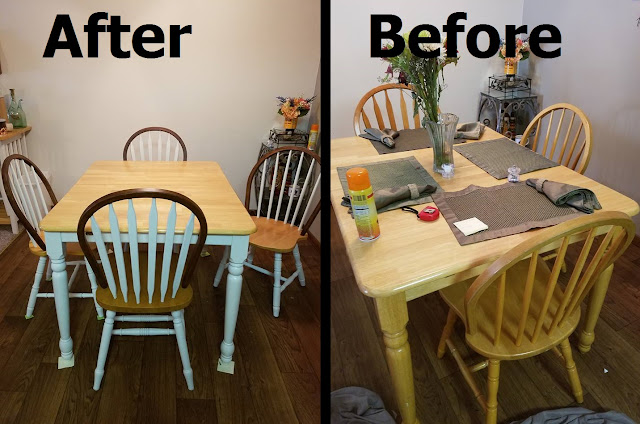
Patrick got a hand-me-down dining room table set from his dad when he went to college. It's super sturdy and the leaf automatics pops up when you expand the table, which is cool.


As functional as it is, it was in rough aesthetic condition. It had definitely seen it's fair share of quarters, beer pong and everything else boys do in college. We looked at getting a new set, but it was spendy.
After 3 days of blood, sweat, and a sore back,  here's what we got:


Not too bad,  right? Unlike the other table make over I did, this one would not be economical to sell because it took so much time to do. But if it's just for you, it's well with it!

Materials:
-sandpaper
-gel stain
-cloth scraps
-2-3 foam brushes
-1 small roller
-interior paint
-paint sealer (to save time, I used the spray can kind)
-paint tray

The table
1. Wash the table and let dry
2. Lightly sand the table and wipe down
*optional: if you are picky about paint getting on the underside if the table, you can use painter's tape to protect it. I didn't care, so I skipped this part. If you're looking at the underside if my dining room table,  you're probably too dunk to criticize me.
3. Roll your paint on a table leg with your roller.
4. Use the foam brush to fill in the parts the roller missed. Be sure to do more dabbing rather than strokes.
5. Do this to the rest of the table
6. After drying, spray with sealer

Chairs:
1. Clean chair
2. Lightly sand chair and wipe it down 
*optional: if you are picky about paint getting on the underside of your chairs, you can use painter's tape to protect it. To see why I didn't care, see the above *
3. Roll your paint on the chair legs with your roller. 
4. Use the foam brush to fill in the parts the roller missed. Be sure to do more dabbing rather than strokes. (Do a thorough check to make sure you didn't miss any spots)
5. Take a roller and paint the spindles of the chair. Use a foam brush to fill in the parts the roller missed. Be sure to do more dabbing rather than strokes. 
*optional: you can take the time to tape each spindle, or you can do what I did. I'm sure they amount to taking the same time, but it felt like I was saving time my way. 
6. If you are avoiding taping (highly advised), apply your paint as close to the bases of the spindles as possible without getting paint on unwanted areas. Then, use a small artist's paintbrush to paint the left over areas. If any paint does get in unwanted areas, use a tooth pick to scrape it away.  
7. Using a scrap of cloth, apply the gel stain to the back of your chair.
*note: you can tape these parts, but I found it was less tedious to use a piece of cardboard to block the stain from the parts I did not want the to be stain. Before it dried, I took a tooth pick and scraped away the strain in the unwanted areas.
7. Wait for the paint/ stain to fully dry
8. Apply paint sealer

(Before)

(During...Yikes)

(After) 


Thursday, January 19, 2017

Healthy Swap #1

Healthy Swap #1

As I mentioned, Patrick and I are trying to be healthier. We I decided instead of trying to give up all of our favorite, unhealthy, "sinful" foods that we could give one food up at a time. This way we are more likely to stick to it and we have a whole month of "practicing" and adjusting. 

This month: Ice cream. 
Replacement: Applesauce. 

I started with a tough one. I mentioned this idea to Pat about a week ago, and he thought it was an excellent idea. The only problem was we still had ice cream in the freezer. 

Well, we successfully finished it off. As Pat was eating his last few bites, I told him I would pick up some applesauce tomorrow. He looked at me perplexed and asked why I would do that (we normally don't have applesauce), and I reminded him of this healthy swap idea. His response (with ice cream still in his mouth), "Wait, we're actually doing that?"

Yes, this will be a hard one for us. 

But we got a jar of homemade applesauce about 2 weeks ago and it was gone in a couple of days. It was a nice little treat, which is exactly why we buy ice cream, as a nice little treat. 

Let's see how this goes. 

Monday, January 16, 2017

Keepin' It Clean

Keepin' It Clean

Nobody really likes cleaning. If I could have a maid just keep my house spotless, that would be amazing. There are times when I enjoy doing a deep clean, but it's not necessarily the act of cleaning I enjoy, it's the meditation during and the feeling of accomplishment afterwards. 


To keep that freshly cleaned feeling, I have made a list of my weekend cleaning chores and spread them out over the week. My husband and I have been doing this for almost a year. It's not fool-proof, you do have to force yourself to keep up with it (just like anything), but it's so worth it when you do. 

Without further adieu, here's our chore list: 

Monday-Dust/1 load of laundry
Tuesday-Vacuum/1 load of laundry 
Wednesday-Clean both bathrooms
Thursday-1 load of laundry/put laundry away
Friday-take out recycling 

I didn't include stuff like dishes, sweeping, or wiping down the counters, because that's stuff I do daily. The key to putting together your own list is to choose 1-2 tasks that you would do if guests were coming over, but not necessarily every night. 

Does my house still get messy? Of course. Do I ever skip a day/week? All of the time. But it helps to make cleaning seem more manageable, and my husband doesn't have to ask what needs to be done. He can just see what chore(s) need to be done that night before we sit down to watch Netflix.  

Oh and this ^^, true story. 

Wednesday, January 11, 2017

Flake and Bake Chicken

Flake and Bake Chicken

When I worked as an AmeriCorps Promise Fellow (highly recommended for those who are interested in becoming teachers), I helped out an after school program. Every Tuesday and Thursday, I went with the kids to cooking class put on the University of Minnesota to help educate kids on basic cooking skills and nutrition. 

It was awesome! They recommended a website with healthy recipes (found below): 

https://cookingmatters.org/recipes

The homemade granola is awesome, too! 

I've tweaked the Flake and Bake Chicken recipe into my own, and today I have done the adult thing in not only making my own chicken strips from scratch, but also making extra to put in the freezer the next time I'm running short on time. 

Here's the recipe:


Ingredients
  • 2 pounds boneless chicken pieces
  • 3 cups cornflakes cereal  or  2 sleeves of salted crackers (like Ritz)
  • ⅓ cup flour
  • 2 large eggs
  • ¼ cup nonfat milk
  • Non-stick cooking spray
  • Your favorite seasoning

Directions
1. Preheat oven to 375°F.
2. Remove skin, if any, from chicken pieces. If working with large chicken breasts, cut in half lengthwise for faster cooking time. Trim any excess fat.
3. In a medium bowl, crush cornflakes/crackers.
4. Place flour in a second medium bowl.
5. In a third medium bowl, add eggs and milk. Beat with a fork.
6. Dip each chicken piece into flour, then egg mixture, then cornflakes. Each piece should be fully coated with flakes.
7. Coat baking sheet with non-stick cooking spray. Place chicken pieces on sheet, evenly spaced. Spray pieces lightly with cooking spray and sprinkle with your favorite seasoning. (I used Cajun and some Lawry's seasoned salt)
8. Bake for 20–25 minutes, removing half way through cook time to flip each piece, lightly spray with cooking spray, and season. The internal temperature should be 165°F.

For visual people, like myself, here are some pictures: 


If you choose to make your breading out of crackers, put your crackers in a large bag (be sure to squeeze out as much air as possible). Roll over the bag with a rolling pin until your crumbs are about the size shown. 

Here's the best set up for your "Flake and Bake" station. You can cut your chicken into strips or into small nugget size. The first container is flour, the second container is your egg mix, the last container is full of cracker crumbs. After dunking your chicken in each container, set them on your pan. 

To add flavor to your chicken, lightly spray your chicken and sprinkle with your seasoned salt/favorite seasoning. Half way through baking, flip the strips over, spray and sprinkle with seasoning again. 


Update: I made a second batch with nugget size chicken pieces, put them in a large freezer bag and froze them. I heated them up in the microwave for lunch on a day, and they tasted fine!


Tuesday, January 3, 2017

Workouts

Getting Fit

Plain and simple, I don't really know what to do when I go to the gym. Thus, I usually end up wasting time and asking my husband if he is ready to go yet. My apartment complex has a small fitness center, and does not offer a personal trainer. Even if I did have access to a personal trainer, I'm too cheap (financially conscious sounds better) to pay someone to help me workout. 


I also don't have time to go to the gym everyday. I know some people say that, but it's true. I teach, which means when I get home from work, I usually have to do more work like planning, grading, etc. 

But I do know that working out leads to a lot of health benefits beyond lookin' good naked. It leads to better sleep, a lower risk of heart disease, a higher sex drive (chicka-yeaaah), and there have even been studies that shown those who are physically active are less likely to have brain plaques associated with Alzheimer's disease. 


Welcome to the struggle of every working adult. 
      (Maybe not a personal trainer. I feel like they kill two birds with one stone when 
      they go to work. Personal trainers, correct me if I'm wrong.)


So I made a compromise. I took a workout originally from Hiitworkout.net (which, fyi, looks like a pretty descent site for free home workout routines if this is one is not your style) and I made it from a 5 day a week, 12 week long workout into a 3 day a week 24 week long workout. That way I can have the flexibility to choose what days I want to workout and which days I'll save for grading. 


Week A, Day 1: check. 


Monday, January 2, 2017

Here We Go

Here We Go

Like a thousand other people out there, I'm starting 2017 bright-eyed and bushy tailed, and inspired to become this "new and improved" person. 

My goal this year: to become a full grown adult. In 2016, I did a lot of adult things. I got my first teaching job at a public school, I got married, I got on my own cellphone plan, and chose my own health insurance. It's time I go from half adult to full adult, and 2017 is the year it's going to happen. 

I was thinking about keeping a journal, and I thought...nah. I'd feel like a prepubescent teenager in the 90s, writing about boy crushes and waiting for my boobs to finally come in. 

I thought about keeping a schedule, but yeah right. As much as I love lists and schedules, I never keep up with them. And I have a husband who absolutely hates set schedules, so I need a little flexibility in my life. 

Then, I came up with a solution. Blogging. The way a full grown adult "journals" these days. So here we go. I can't guarantee anything but honesty in this blog, and probably a lot of failure, and maybe even a little success. Here..we...go.